Pin It button on image hover
Showing posts with label Mosaic Flower. Show all posts

Saturday, 26 March 2022

mosaic (by Veronica)


Good morning everyone - for my last post this month I am using the mosaic flower stamp by Chocolate Baroque from last month's tv shows.

I was trying to be clever here, and i am not too sure it worked.

I was trying to create a traditional Roman style mosaic floor in the background using alcohol markers to colour the tiles and a blending pen to spread the colour out beyond the tiles. In hindsight I think it would have been better to be random rather than trying to make a square pattern!

The seed heads were also coloured with alcohol markers 


Tuesday, 22 March 2022

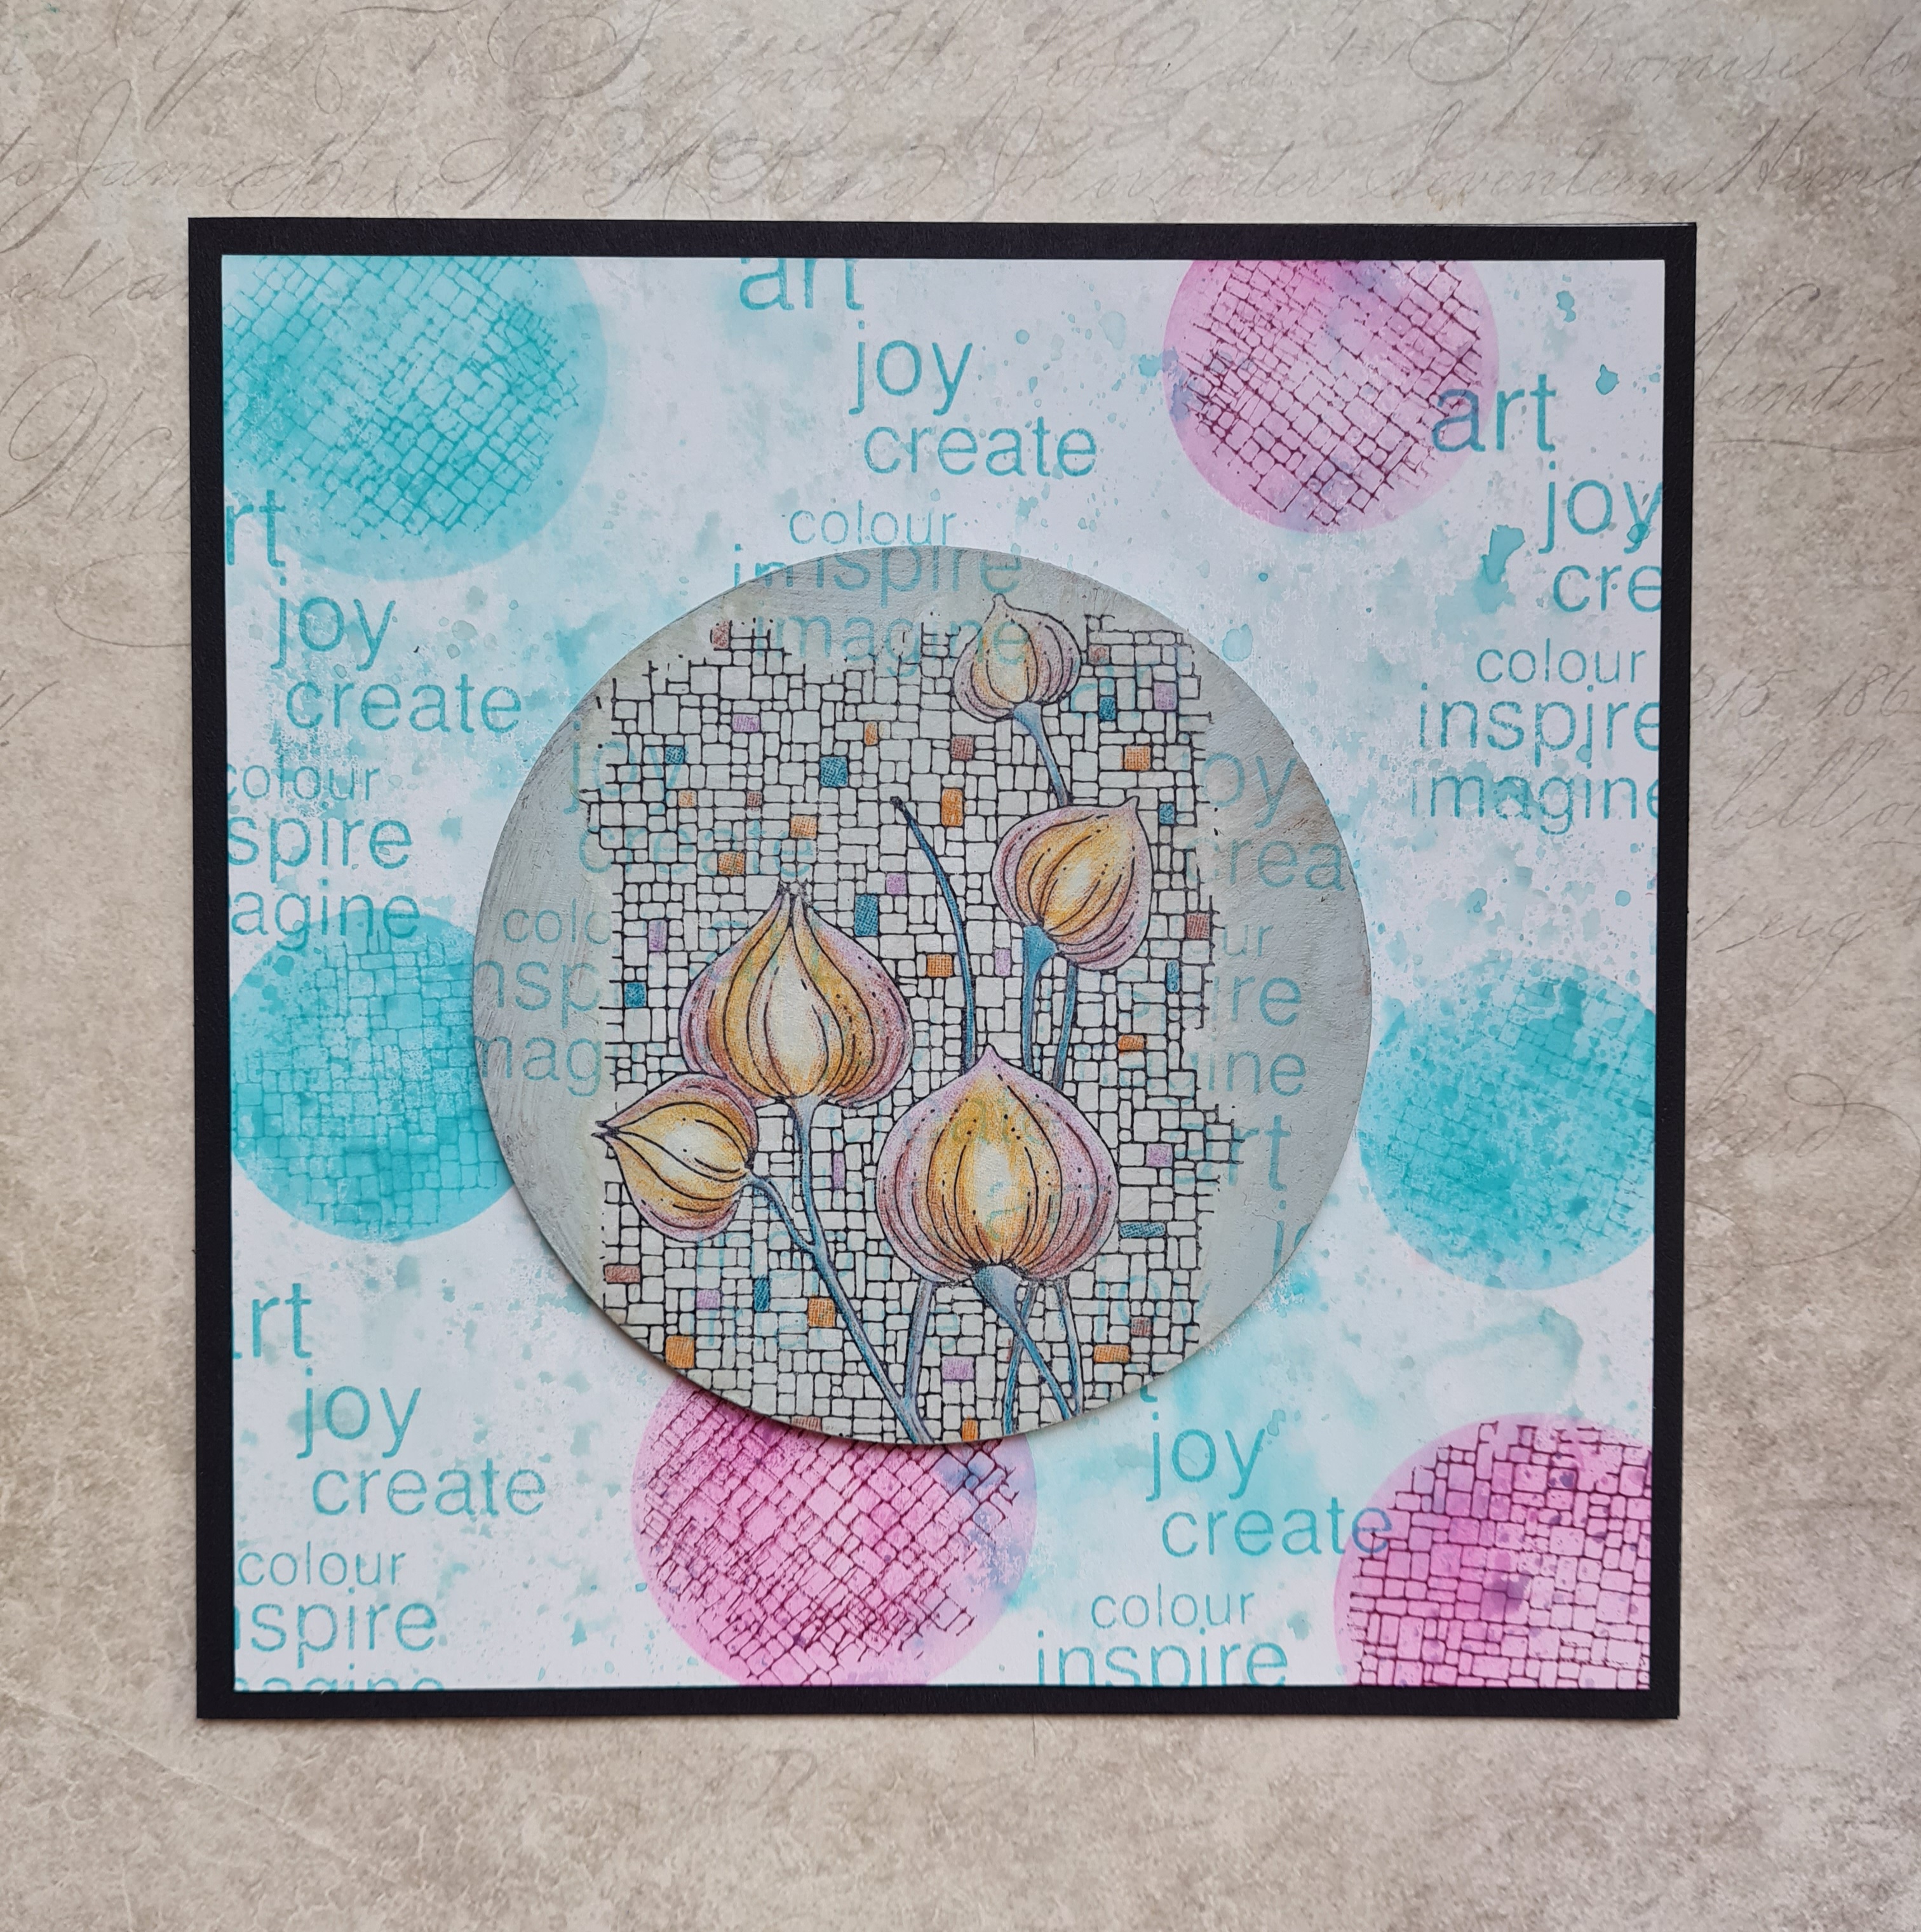
Mosaic Circles (by Judith)

Hello everyone, I hope that you are keeping well. I have a project to share with you today showcasing stamps from last month's TV shows.

I created a background using Distress Oxides, and then used a stencil to apply colour over the top with blending brushes, and stamped On The Tiles through the stencil with a corresponding colour in Archival Ink. I added some words from the Bird of Joy stamp to the background to finish.

I painted a chipboard circle with acrylic paint, mixing white with a dark green to get the colour that I wanted. I added the same words that I had used on my background over the circle. I stamped the Mosaic Flower onto a piece of tissue paper, and coloured it with pencils, before sticking it to the circle with Matte Medium. I then attached the circle to my background, and used a piece of black card as a mat before adhering the background to a card blank.

I will be back next month with more projects to share with you. Thanks so much for stopping by, take care,

Judith xx


Sunday, 20 March 2022

Tile it With Flowers by Doreen

 Tile It With Flowers

Hello everyone, today I am sharing a simple quick make all it needs is some preparation before either going to bed or the day before making the actual card, this will give the paste time to dry properly.


To start this card I just used a background from my stash which I wiped over with an antistatic bag. I used  ' Have A Magical Day ' from the Say it Vertically stamp set of various useful sentiments. Stamped using a Versamark Inkpad and heat embossed with a Copper embossing powder.

The Mosaic Flower which I prepped the night before peeled away easily from the stamp but where I had been a bit too frugal with the paste left areas behind that hadn't fused together properly but I think it adds to the effect.
To make the image pop I used a Permanent Black Fine liner Pen.

To mount I used a silicone gel.


Thanks for looking in today 

Love Doreen


Saturday, 5 March 2022

Glorious Floral Delights (By Tracy Thompson)


This is my first post for this month using the fantastic stamps that were shown on one of the February's shows.  So first I would like to show a book I created using the following stamps - Mosaic Flower, Bird Of Joy, Floral Delight, Wish Flower and Glorious.
So all my images were layered onto black card and added to the book, for the front cover I stamped the Mosaic Flower but upside down so it looked like the Chinese lantern plant, I stencilled in the background and coloured the image with pencils.  I added the words and did some highlights with a white gel pen.


The above pages and the ones below were done very much the same as the cover, only when I did my stencilling I masked down each side and only stencilled in the centre.  I wanted to stamp my images to the side for a different look and to get the benefit of the stencilling.  Each image was coloured with pencils in co=ordinating colours to the stencilling.  

For my next creation I made a large tag, using a die I cut the tag set which is a base, top layer and the eyelet covers.  


I coloured the base tag in Distress Oxide in a matching colour to the the colours in the top layer.  The top layer I smooched several colours for the background, then using the Butterfly Mind stamp set I stamped the main image, then stamped again on spare card, coloured the butterflies then cut them out.  On the background I added words from the set and splatters too.  I added the Butterflies, decoupaging onto the main image.  And finally some glitter was added to the Butterflies.

I will be back later in the month with some more creations from the Chocolate Baroque show, thank you for taking a look.

Happy crafting
Tracy x

Thursday, 3 March 2022

One Stamp , 3 Ways by Sandra

Hello everyone, today I am sharing three of my cards from the February show on The Craft Store which is now known as Create and Craft.

I used the Mosaic Flower stamp set and it is so versatile.
Sentiments are from Say it Vertically

For my first card I have used alcohol markers and coloured some of the Mosaic background in bright, summer colours and left the flowers uncoloured. I have mat and layered onto a 7"x5" card base using coordinating colours of cardstock. Great for a birthday card.

For my second card I have used soft purple markers to colour the flowers and added some green to the background. I found this combination very peaceful and ideal for those difficult cards we have to make sometimes.  I have mat and layered onto a 7"x5" card base.


My last card today is coloured in vibrant reds, which could even be adapted to a Christmas card!

I have made this card 8"x8". By adding just a small amount of detail around the main image it makes a lovely larger card.  Detail stamp is from Modern Textures


Thank you for looking

Sandra x


Friday, 24 July 2020

Make your mark (by Miranda)


Hello there,

It's me again, with some inky inspiration.......hope you like it.

Today I have used these stamp sets:


Again a background from my stash, this time made with Derwent Inktense art bars. When you use these, your background will be waterproof......

First I stamped the Mosaic flower using Memento London Fog. Then I stamped fragments of the 'on the tiles' background around the image.

I have used one of the stamps of the 'make a mark' set to create a structure on the edges using Memento Cottage Ivy. You can see that grungy structure below ...


here you can see the sparkle of the embossing powder a bit better.....
I have colored the flowers with my Derwent Colorsoft and used a white acrylic marker for some accents.

Then I did some embossing on the circle stamps and the dot texture. Make your mark is such a versatile stamp set, a real must-have and I will use that one a lot!

For the circles I have used Wow Cupcake Heaven, a lovely hot pink glittery powder and on the sequin dot stamp I have used Wow Peridot and 'jealous guy'. They have such funny names......

I stamped the text 'I make time to make Art't  from the Artistic Affirmations but only the words ' make Art'


Thanks for your visit and hope to 'see' you next time. Will be back next week!
Stay safe and creative,


Monday, 22 July 2019

A Trio of Cards (by Debbie)

Hi everyone it's my turn on the Chocolate Baroque Design Team blog today. I love all the great background stamps from Chocolate Baroque and my first design is just concentrating on using Damask Panel.
I started out by embossing three times on white card using a black inkpad and clear embossing powder. That done I got out my Distress Inks and sponged Seedless Preserves and Salty Ocean softly over the entire area. I then cut around two pieces leaving a narrow border and then mounted onto black card. The card blank is a white DL used sideways and as you can see I've attached one piece at the bottom right of the card and then turned the other piece up the other way and mounted it slightly over the bottom piece and standing up over the top of the fold of the card. I used 3D foam tape for this piece to give some dimension. From the 3D piece I die cut the tag and layered it onto some white card. The sentiment which has been stamped onto a punched circle, comes from Words to Dazzle and Sparkle, and I've edged the circle with a black pen. To finish I've punched three smaller circles, edged them also with black, and attached to the bottom left.

For my next design I've used one of my favourites, the very useful Mosaic Flower. I'm a great fan of monochromatic designs using just one colour but this technique using a spot of colour works well too for quite a dramatic effect.
I've stamped twice and coloured one piece with simply red and grey pens. I've then punched four circles from the image and again edged them with black pen. I've then simply overlaid them onto the other image matching up the design carefully. The 5" x 7" white card blank has been randomly stamped with On The Tiles using a grey inkpad and the image mounted onto red card before attaching to the card blank. The sentiment once again comes from Words to Dazzle and Sparkle.


My third design is a December birthday greeting using Hark the Christmas Rose stamped onto White Silk Board with black ink and embossed with clear embossing powder. I've watercoloured with the gorgeous Koh-I-Noor Brilliant Water Colour Palette and mounted onto brown card before attaching to a 6" x 6" ivory card blank. To finish I've wrapped some baker's twine around the fold of the card. The cute birthday greeting comes from the newly launched Christmas stamps, Christmas Circles.


Thanks for stopping by,

Debbie.
 

Monday, 24 December 2018

Mosaic Flower Birthday (by Pat)

Hello everyone, today sees the last post this month from our Guest Team member, Pat. She has designed a delicately coloured card using one of our individual flower stamps to inspire you.

Pat writes:

Hi everyone,

I am back with my last card for this month and it features the Mosaic Flower stamp. I started with a background which was made using a couple of different shades of blue Distress Ink spritzed with water on my glass mat, and then the card pressed into it to pick up the colour. I thought they would make a good background for these pretty flowers, which actually remind me of Chinese Lanterns. I stamped andheat embossed them using silver embossing powder and then watercoloured with a waterbrush using yellow with just a touch of orange to shade, and some brown for the stems, all Distress Inks. I also picked out some of the mosaic tiles in several of these colours.

I finished with some blue card as a background and also added a sentiment from the Paisley Elephant set, heat embossed with silver embossing powder onto a piece of the same blue card, and I added craft foam behind it to raise it up a little.


As it is Christmas Day tomorrow I would like to wish you all a very Happy Christmas and a healthy happy and wonderfully creative New Year.

Pat x


Monday, 26 February 2018

mosaic flower (by Veronica)

Good morning everyone, I hope that your morning is as bright and sunny as mine - am trying to ignore the weather forecast for snow, and the fact that there is a very cold wind outside!
I loved this stamp, which reminds me of honesty - I had wanted to stamp onto vellum to try to copy the translucent effect of honesty, but couldn't find any. Instead I stamped with versamark onto kraft card and embossed in white then painted with pearlescent paints.
I tore around the image, inked the edges with versamark and dipped into gold embossing powder. A mat of dark brown card got the same treatment.
The white base card was randomly stamped with vintage photo distress ink, just holding the stamp in my hand so there was only a partial image stamped. Edges sponged with more distress ink, then the pieces glued together.
It is a very quick card, I think it took longer for the heat gun to warm up and do the embossing than for anything else!

Tuesday, 20 February 2018

Wish by Brenda


Morning Peeps, my turn to share some more inspiration from Lesley's Chocolate Baroque Birthday shows on Hochanda using the gorgeous new floral stamps and colouring pages.

My starting place for the above card was to use Distress Inks to colour a piece of Bristol Vellum card stock and then add some stenciling. I stamped Wish Flower with Versafine Black, colour in with glitter pens, cut out and fix onto my background. Using sticky notes as masks I stamped the words individually onto cardstock coloured with the same Distress Inks, cut out and added to my card, then mat and later onto the base card.


This once did take a little time but I really liked the finish result. Using Wish Flower again, but using just the smaller of the two blooms masking the stamp with sticky notes and inking and stamping each flower one by one........make sure you don't forget to remove the mask for each stamping. I then coloured the flowers with pencils, stamped a sentiment from Birthday Words onto a piece of ripped velum and fixed across the stamped panel before matting and layering onto the base card.


This is one of the Colouring Pages which has the lovely Macintosh Beauty image on it, I simply coloured with pencils and framed.


My final piece of artwork today used the focal flower from Mosaic Flower. I started by using Distress inks to add watery colour to a piece of watercolour card the added some random stamping using the harlequins from Decorative Edges and Versafine Black. I cut two die cut circles coluring them with the same DI's as the background, then stamped the flower onto the smaller circle and added some colour again using the same inks. Next I placed some twine onto the base and fixed the circles and also added a few back sequins.

Friday, 16 February 2018

Create Art (by Magda)

I am happy to share with you some projects made with the new stamps from Chocolate Baroque:

Wish Flower
Mosaic Flower
Bird of Joy


I used various products for these projects:

Watercolor Pencils
Distress Ink Pad
Brusho
Stencils
Archival Ink
Stickles Crystal
Mesh wire
Wire
The sentiments  Words to Dazzle and Sparkle and Loving Sentiments

As you see the result of each card is different, which one do you prefer ?
Have a nice day and happy colouring
Magda

Saturday, 10 February 2018

Book of Flowers (by Judith)

Hello everyone, I have a project to share with you today showcasing all of the beautiful stamps featured in the Anniversary shows in January on Hochanda. I hope you managed to catch the shows, they seemed to go in a flash, and Lesley and I were overwhelmed by your enthusiasm for all of the products that we brought to share with you!


My project is a concertina book, made with two pieces of whiteboard for the covers, which I have covered with some lovely patterned paper by Crafty Individuals. I stamped one of the images, minus the words onto the cover, and coloured it with the woodless pencils that we also featured on the show.

I created some pages for the book using smooth watercolour paper, but the cartridge paper that is available on the website would work equally as well. Each page measures 10.5 cms x 14 cms, and I allowed an extra panel to join the sections together each time. I decorated the back of the pages using Distress Ink, and stamped the words from several of the images on top, creating a tone on tone effect.

On each page front, I stamped a different flower image, and coloured these with Distress Inks, keeping to a common colour theme throughout.

As I assembled the book, I added some ribbon, which allowed the book to be tied shut with a bow. This was such a fun project to make, and would be a lovely keepsake for someone special.

Thanks for stopping by,

Judith xx


Thursday, 8 February 2018

Friendship by Brenda


Good morning, today I would like to share a few of my samples from Lesley's Hochanda shows which celebrated Chocolate Baroque's first Birthday with the channel when viewers were treated to some wonderful new floral stamps and colouring pages.

This release was right up my street and I have to say I thoroughly enjoyed making these samples and it was only time that prevented me making more.

So to my first card at the top uses the beautiful Medici Flower. On this occasion I only wanted to use the focal flower so I used sticky notes to cover the areas around the flower, inked it with Versafine Black, removed the masks and followed the same process three times. I then masked the  individual stamped flowers and stamped the Poppy heads from Poppy Meadow along with a inspirational quote from Pretty Poppies. Next I flicked some watery distress ink onto the white space and finally coloured the blooms with sparkle pens.


I really love this image, it's called Mosaic Flower but to me it yells out Chinese Lanterns. I stamped the image with Versamark and heat embossed with detail gold powder, coloured the flower hears with pencils and rubbed some gilding wax around the edges. Some twine and a button tied around before matting onto a pieced of corrugated and then the base card.


I painted this little box with acrylic and shimmer paints, then used a stencil and texture paste to add some flourishes. When dry I used a slightly darker pain to highlight the stenciled patterns and added gilding flakes here are there and along the opening edges. The flowers on the top were cut from one of the colouring pages, coloured in with pencils and fixed to the top along with some die cut leaves.


My final share today used the new Floral Delight stamp which I stamped once, masked and then stamped part of the stamp a second time and coloured in with pencils.  Using a mask I added some sun rays and stamped three of the words from Wish Flower, cut out and added individually to the finished piece.  

Thank you so much for popping in today.


Saturday, 3 February 2018

Mosaic Flower Wish (by Anne)


Ooops – I mixed up my dates and just realised that it’s today and not Monday for my turn to blog! Sorry to be a few hours late today folks x.

Here is one of my samples using the lovely Mosaic Flower stamp. A fabulous stamp for creating easy projects as the background has already been done for you. I also used a pretty background paper from Crafty Individuals (Travels in Italy).

I stamped the Mosaic Flower onto the background paper and onto a scrap of stamping card with Versamark Ink and heat embossed using WOW Embossing Powder (White). The flower buds were cut out ready to decoupage. I also stamped and embossed the sentiment from the Wish Flower stamp.
I brushed a little Peacock Feathers Distress Ink over the sentiment to make it stand out more from the background (the embossing resists water based inks). The panel was edged with alcohol ink pen to frame.

Flowers and stems were coloured with watercolour pens and overlaid with a bit of yellow alcohol pen (note: this tints the white embossing). The cut out buds were lightly shaped and glued onto the card front using 3D glue gel for added depth.